
Pinterest has become one of the most dominating social media websites on the net. With millions of people pinning every month, Pinterest attracts more people than Facebook, Instagram, and other social platforms. The Pinterest audience includes people from all demographics, ages, and socioeconomic backgrounds.
Continue reading if you want to learn how to post on Pinterest as many as 7 different content types.
How to Create a Post on Pinterest
- Log in to your Pinterest Account
- Click the ‘+’ icon at the bottom-right of your screen
- Select ‘Create a Pin’
- Upload your image, add a title, a description, and the destination link
- Click Create board to create a new board, or select the drop-down menu on the top-right and select a board you wish to save to,
- Save
What are the Main Benefits of Creating Your Own Pins?
There are many benefits to marketing your business account on Pinterest including:
- connect with your targeted demographic
- monitor upcoming Pinterest trends
- Pinterest drives more organic website traffic to your site
- daily Pinterest traffic is higher than any social media page
- linking your blog posts to your pins automatically drives more followers to your website
- Pinterest analytics are better than other social media platforms so you can gather more information about your Pinterest marketing strategy
How to Post a Pinterest Pin 2024
With the sheer volume of fresh pins created and viewed daily, it is important to create pins that stand out in the crowd. That means rather than going for quantity when pinning, focus on creating high-quality pins.
Step 1: Create a Pin
Once you have created a Pinterest account, creating a new pin is easy. First, go to your Pinterest profile. At the top of your profile, click on the plus sign (+). From the dropdown box, click on “Create a pin”. A blank pin template will open.
Upload your pin image in the gray image area. You can do this by uploading an image from your computer or mobile device by opening your photo files or by opening a URL link where the image is located in your blog.
The images should be high quality and clearly reflect what your pin is about. Once the picture is uploaded, enter your website URL destination link if the image is already live on an active website.
Step 2: Add title and description
After you have the picture uploaded, it’s time to add a pin title and description to your new pin idea. The title should be something enticing that accurately captures the content of your pin.
Your description can be a maximum of 500 characters. Your pin description should also accurately describe what your pin is about while enticing your followers to engage in your pin board and site. Using a Pinterest SEO-rich description will optimize your pin in searches.
Include a call-to-action in your description to encourage your followers to visit your website.
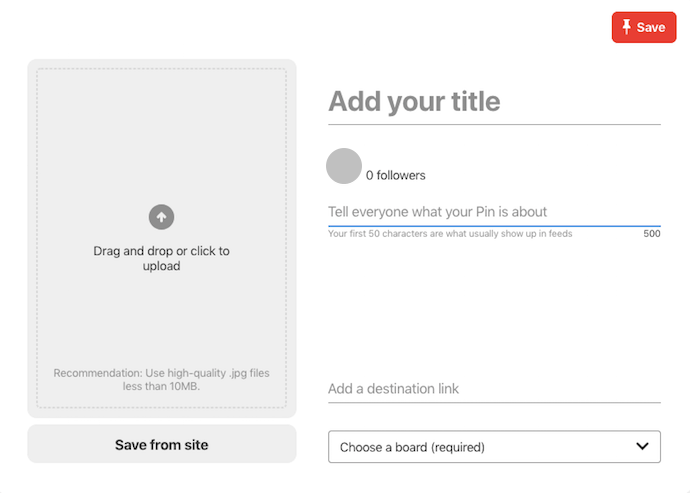
Step 3: Choose Pinboard
Once your pin has been created, you will need to choose or create a pin board where your pin will be added. The Pinterest board should accurately reflect the topic of your pin.
Step 4: Save the Pin
Once all the information is added to your pin, click on the Save button. Prompts will then appear to instruct you on how to publish your new pin.
When creating a fresh pin, it is important to remember that viewers do not like to be deceived and they are not interested in looking at pins that misrepresent a topic. Make sure the pin’s image, title, and description accurately reflect the content of your pin.
How to Post Story Pins
Story pins are a relatively new feature on Pinterest. They allow the user to create multiple pin pages simultaneously in one pin to tell a story. When creating a story pin, Pinterest account holders can upload up to 20 pages of photos, videos, and text content into one pin.
This type of multi-page pin is ideal for increasing organic Pinterest traffic to your board because story pinning attracts more viewers. They also effectively increase your online audience reach. Content creators can take advantage of this feature to create tutorials, recipes or craft project stories, or other how-to posts.
This new Pinterest feature is not available to everyone so if you do not have this feature on your Pinterest account, you will have to apply for it.
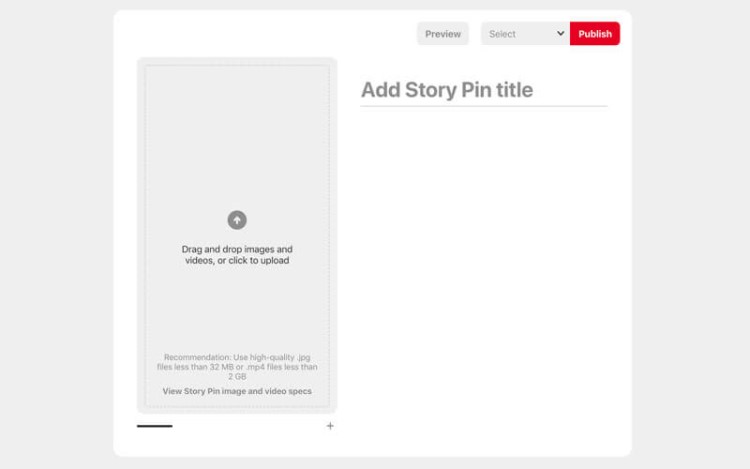
Step 1: Create a Story Pin
Once you have the feature, you can start creating your own pin stories. To do this, click on the ‘create story pin’ from your create tab on your Pinterest profile. Once the template opens, upload one to 20 images or video clips that you want in your story.
Click the plus (+) sign each time you want to add a video or photo. Videos should be less than 60 seconds in length. Both the pictures and videos should be clear and of high quality. When designing your fresh pin, make sure your images and videos are in the proper order.
Step 2: Add theme and description
Choose a theme for your promoted pins. Add a clear title that states what the story of your pins is about. Write SEO-rich descriptions for each video or image in your story. Each description should be catchy, clearly tell the Pinterest follower what the picture or video is about and follow the natural flow of your story.
Whether the text is part of a continuation of a blog you are sharing, instructions for a recipe or DIY project, or part of a learning tutorial, the pin content should flow smoothly and organically from one page to the next.
Step 3: Add tags
Once all the pages are created, choose up to ten Pinterest tags that can be used in search engine searches to attract more Pinterest traffic to your story.
Step 4: Publish
Pick the Pinterest board which your story will be saved under. Once you are ready, click ‘publish’ to upload your Pinterest story onto your followers’ pin feeds.
How to Post a Pin from Your Own Photos
When creating a Pinterest pin from your own photos, you can follow the same process for creating a regular pin. After clicking on creating a pin button from the plus (+) sign on your profile page, you can upload a personal photo from your computer or device photo files.
Use high-quality, attractive images that will catch your follower’s attention.
Once the image is uploaded, add a title and Pinterest description of the photo before saving it under one of your personal blog boards. Whether creating a business account pin or a personal pin, make sure the title, content, and description are all accurate and clearly reflect the topic of your pin.
You can also add an alternative text description under your title to inform your viewers what your pin is about.
How to Post an Ad on Pinterest

Advertising one or more of your pins is a great way to increase online traffic. Using Pinterest marketing tools can generate more viewers for your business webpage than all other social media pages, including Facebook advertising. To create an ad on Pinterest, you must have a Pinterest business account.
Step 1: Create a Pinterest Ad
After logging into your business account, click on ‘create ad’ at the top of the page. Once the template opens, click on ads on the left side of your screen.
Following the prompts, click on the board’s button on your Pinterest profile to select the pins you want to promote. You can select one or all of your pins in the chosen boards by selecting or deselecting all Pinterest boards and pins.
Step 2: Edit Pinterest Ad
After selecting all the pins you plan to promote, do a quick review to make sure you have chosen the right pins. Edit the titles, descriptions, and URL destination if needed.
Step 3: Launch Pinterest Ad
Once all your changes are made, you can preview your ad on your Pinterest profile to make sure it is designed properly. Click on the launch tab. If you have made any errors while creating your ad, they will populate in red.
You will not be able to post on Pinterest your ad until all the issues are resolved. Follow the information provided to make any edits. Click on launch again.
Once you have finished pinning your ad, it will be reviewed by Pinterest staff to make sure your content follows their advertising guidelines. Once approved, your ad will be seen on your followers’ main feed page.
How to Post a Pin with a Video
Video pins tell a more inclusive and thorough story than still image pins so they are more favorable with many business account users. Pinterest business accounts allow up to 2 GB or up to 15 minutes of video space per pin. This provides content creators with many options when pinning videos.
Step 1: Create a Video Pin
To post a video on Pinterest, log into your business account and click on ‘create pin’ at the top of your page. When the template opens, upload or drag a video into the image uploader.
If you are planning to upload more than one video, click the plus (+) sign to upload additional videos. If you are creating a video ad, the Pinterest online help center for business recommends each video be between four to 15 seconds in length.
Step 2: Choose a still image
From your video, choose a still image pane that your Pinterest followers will see on their feed. Keep in mind, the still image should be clear, and eye-catching, and must accurately represent the contents of your video.
Step 3: Add title and description
Write your video pin title and description. The title must accurately state what your video is about. Search engine-optimized descriptions should be no more than 500 characters maximum. If you are pinning more than one video, write additional text for each video explaining to viewers what each video on the pin is about.
Step 4: Publish Video Pin
Next, choose the board where you will put your new pin and click on publish. You can opt to publish immediately or set a scheduled time.
Before the video is published, it is reviewed by Pinterest advisors to make sure it complies with the social media site’s community guidelines. If your Pinterest graphic does not comply, it will not be published and you could lose your access to posting on Pinterest pins with video attachments.
How to Post a Promoted Pin
A promoted pin design is a paid ad that runs on a cost-per-click campaign.
Step 1: Create a Promoted Pin
To set up a promoted pin, go to your settings on your business account and click on ‘promoted pin’ from your drop-down box.
Next, choose the type of promotion. You have two options to pick from:
- Get more traffic to your website
- Boost engagement with your pins
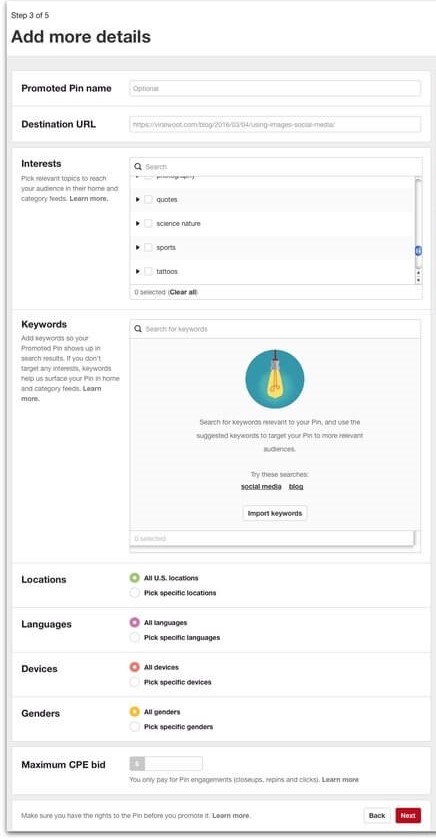
Step 2: Create your campaign
Follow the instructions to create the campaign. You will need to name your campaign, the to and from dates that you want to run your campaign, and your daily spending budget. This includes how much you are willing to spend each day to promote your pin and how much you want to spend on each cost-per-click to direct your Pinterest traffic to your website.
Step 3: Review your Pinterest campaign
Pick the keywords you will use to attract your Pinterest audience. Once you have finished filling in all the information, review your Pinterest marketing campaign.
Once your promoted pin is live, you can use the Pinterest algorithm tools to monitor your promotions activity including website visits, repinning of your pin, and any Pinterest traffic drops or increases.
How to Post a Carousel Pin on Pinterest

A carousel is a pin with multiple images attached. It allows your Pinterest followers to swipe through to each image to see your promoted pin’s story. Business account holders with this feature can upload carousel pins to show different views of a product they are selling, promote many products at once, or tell their brand story.
Step 1: Create a Carousel Pin
To post a carousel pin on Pinterest, select ‘create ad’ from the top of your business account page and choose your goal. Before uploading your pictures, you will have to add the campaign details needed to promote your carousel as a Pinterest marketing campaign.
This includes your target market details, budget, promotion schedule, and search engine optimization and delivery goals. If your carousel is not being created as an ad, you do not need to complete this information.
Step 2: Upload Images
Once you have identified all your campaign goals, you can upload your images by clicking on the create carousel section of the carousel content creator template. Carousel pins have between two to five images. Always upload your images in the order you want them to be seen.
The images must be static pictures and they must follow the Pinterest sizing guidelines. For example, square images will have an aspect ratio of 1:1 while the aspect ratio for vertical rectangular pictures is 2:3. Add the landing page URL for each image.
Step 3: Add title and description
Write an accurate, catchy title and enticing SEO-rich description.
Step 4: Publish
Once all your information is inputted, choose a relevant board on your site to place your carousel pin and press ‘publish’. Once your carousel is approved, your followers will be able to see your carousel pin on their main feeder page.
Tips on How to Optimize a Pin
Pinterest is one of the most popular social media pages on the internet. It has millions of users pinning and viewing other people’s pins regularly. With the volume of Pinterest traffic on the site daily, it is a great place to promote your business.
However, because there are so many users pinning every day, you need to optimize your pins so they will stand out.
To optimize your pins and increase your website and blog traffic, start by optimizing your Pinterest profile. Create a catchy name to attract viewers. When creating boards on your Pinterest account, choose names with search-engine-optimized keywords to attract viewers.
Pinterest marketing tools have their own list of Pinterest trends and keywords that you can review when picking optimized words to name your boards. You can also view other people’s pins and boards to see what names attract more attention.
Use high-quality photos that are visually appealing to your followers. When writing your descriptions, make sure they are accurate, and catchy and include Pinterest SEO keywords.
Avoid using hashtags. They may work on other social media pages, but hashtags are not useful on Pinterest. The Pinterest analytics tool can help you analyze the effectiveness of your Pinterest strategy for optimizing your pins and assessing your optimization strategy.
High-Quality Image
Using high-quality, clear images on your Pinterest account is an important part of your Pinterest marketing strategy. Poor-quality images can easily and quickly cause your Pinterest traffic to drop.
Never use images that have been stretched or do not fit within the Pinterest sizing guidelines because they will look blurry on your Pinterest page.
Your profile image should be between 400×400 to 800×800 pixels. Your Pinterest board cover pictures should be no more than 200×200 to 400×400 pixels.
Pinning image sizes will vary depending on your layout. Square pins should be between 600×600 to 1,000×1,000 pixels while vertical rectangular Pinterest graphics should be no more than 600×900 to 1,000×1,500 pixels.
The images should not only be clear but they should not be cluttered or overshadowed with busy backgrounds or large lettering. The colors should be bright and the picture should attractively inform your followers what the pin or board is about.
Add Context to Your Content
With the number of users and content on social media pages, as a content creator, you must engage with your audience. The content in your pins must have the context to attract and retain your Pinterest traffic. High-quality pin ideas will attract more Pinterest users to your site than poorly developed pins.
Start by choosing an eye-catching image to get your viewer’s attention. Once you have their attention, create content that solves a problem, answers a question, tells a story, or provides an intriguing piece of information or data. Your followers should leave your social media site feeling like they have gained new information.
Links With UTM Parameters
You can add a UTM tracking code to your blog post with Google Analytics. UTM parameter links let you see how often your pins and repins are viewed on Facebook and other social media or website pages.
From your Google search engine page, type URL Builder in the search bar to find the link. After you click on the link to open the builder, follow the instructions to fill in the mandatory blank fields for each social media platform where you want your Pinterest pins tracked.
Once you have created your UTM parameters, you can use Google Analytics to track your pinning and repinning traffic.
Attribution
Attribution is a Pinterest analytics feature that calculates the number of days someone views your pin, engages with your pin, and clicks on your pin to access your web link or make a purchase from your online site.
Views are pins that are seen on a user’s Pinterest feed. Engagement occurs when a follower clicks on your pin or saves your blog post to their own relevant board.
Default attributions are set when you create an ad on Pinterest. However, you can also set your own attributions as part of your Pinterest strategy when creating your ads. Follow the instructions under the attributes section of your ad template to use the default attributes or set your own marketing strategy standards.
Add SEO-Rich Description
If you have a business account, part of your Pinterest strategy to generate traffic should include writing SEO-rich titles and descriptions to generate more Pinterest traffic to your boards. Pinterest has its own keyword research tool to find the top SEO keywords used by other pinners.
Rich pins are another marketing tool on Pinterest that automatically synchronizes information from your site to your promoted pin. Anyone can use the rich pins tool as part of their Pinterest marketing strategy to generate more web traffic to their web and social media sites.
Call-to-Action
Calls-to-action is an important part of your Pinterest marketing strategy because they are a highly effective way to encourage viewers to do more than just look at your pin.
Start sentences in your description with phrases like ‘click on’, ‘repin’, ‘learn more’ ‘enter our’, or ‘buy now’ to encourage your followers to act on your pin’s content.
Optimize the Other Pins on the Board
Optimizing other pins on your board will increase the Pinterest traffic to your Pinterest Account. To optimize other pins, use Pinterest SEO keywords in the titles and descriptions of each pin.
Optimizing your business account boards will optimize all pins in that board. To optimize your board, use Pinterest SEO keywords in the title and description. Categorize your boards according to the top Pinterest trends.
Create a separate blog board for all your blog posts. Rearrange your boards so the top boards are relevant to the season and holidays. Use eye-catching images on your board’s front.
Avoid Hashtags
Hashtags do not help with your Pinterest marketing so they should not be used if you want to promote your pins. Unlike Facebook or other social media pages, Pinterest algorithms do not measure hashtags in keyword search analytics.
Consult Pinterest Pin Size Guide
Pin designs should be kept within a certain size ratio so they are not overshadowed or cropped. When pinning your content, the pin size guide recommends long pins have an aspect ratio of 2:3 or 1:2.1 while the smaller square pins have an aspect ratio of 1:1.
Images should be between 600 pixels to 1000×1500 pixels to make sure the images are not blurry or of poor quality.
Experiment with Visual Style
Creating high-quality, dynamic visual images will attract more organic Pinterest traffic so do not be afraid to experiment with the visual style of your pins.
The visual style in your blog posts and pins is very personal because it represents your tastes and creative individuality.
Make Your Pinterest Pins Mobile Friendly
Over 80% of Pinterest traffic uses a mobile device. When creating pins, choose a vertical image so your pin is not cropped on the smaller screen.
Font size matters when writing a title on your fresh pins. They are competing with the image so if the letters are too small, your title will not be seen. However, if the lettering is too big, your pin cover could look cluttered. Keep descriptions of your idea pin to a minimum of 50 to 100 characters so they are easier to read on a mobile screen.
Highlight Your Offerings on Your Pin
If you have something exceptional to say through one of your business account pins or a great comment has been made by another follower on one of your pins, you can highlight the comment.
To do so, click on the pin. Click on the three dots (∙∙∙) under the comment and click on the word ‘highlight’ when it appears.
Fast and Easy Ways to Make Beautiful Pinterest Pins
Beautiful pins will increase the traffic to your business account. There are many online tools and Pinterest courses to help you create beautiful pins.
Some of the most popular online design tools are:
- Snappa Online Design Tool helps you create stunning social media content, ads, blog posts, pins, and other online designs.
- Tailwind Create is an online social media design tool. This free software tool lets you create dynamic posts for Facebook, pins for Pinterest, and content for other social media pages.
- Canva has numerous easy-to-use templates you can design for any blog page, website, or social media post.
- Pinterest Pin Editor helps you design rich search engine-optimized pins on the site. The editor is easy to use. It is a great tool to help improve your Pinterest marketing plan.
- Pinterest Pin Design Tips have hundreds of Pinterest trend ideas to help you develop eye-catching pins on your site.
Color
Using color in your pins means different things to different followers. When choosing a color for your background, select shades with medium lightness and 50% saturation so it does not overshadow your image or lettering in your pins.
Photos
Photos are important features in your pins and boards because your images are the first thing your followers see. When pinning, you can choose different types of images and personal photos as long as they are relevant to your topic and audience.
Lifestyle photos are more personal and natural but they can also look very poor quality if you are not careful. When using your own photos, be sure to choose vibrant colored images that have clear contrasts and shapes so they stand out. Personal photos should also be relevant to the topic and description of the pin.
If you prefer not to show a face, you can crop the picture or hide the face with a natural and relevant object or pose that turns the face away from the camera.
When using photos from an online site, make sure they are creative commons images that are free to use for commercial and non-commercial use.
Text Overlay
Your text can quickly overshadow or fade into the background of your pin’s image. When choosing a font, pick up to three simple typefaces maximum. Choose a font personality that reflects the content of the pin.
Make sure the size is big enough to be readable but not too big that it covers the image. Avoid too many words in your title. Preview your pin on your computer and mobile device to make sure it’s readable.
Design
Your design portion of your pin should be 2:3 so it is clear to see and does not get cropped on a mobile device. Add a watermark on personal photos to protect them from being used by other followers.
You might be interested to check those related posts as well:
- How To Increase Pinterest Traffic in 2024 [The Ultimate List]
- The Best Pinterest Hashtags 2024 [Ultimate Guide]
- 36 Best Pinterest Strategies 2024 [Learn Digital Marketing]
FAQ
How do you get a Pinterest button?
Each search engine has different instructions for downloading a Pinterest button. From your default website engine page, go to your browser or store page. Follow the prompts provided to add a Pinterest button to your browser.
Is there a Pinterest button for iPad?
A Pinterest button can be found in your settings. If it is not there, go to Safari, and search Pinterest.
Is there a way to upload multiple images to Pinterest at once?
When creating a pin, you can add multiple images onto one pin. To add more photos, click on the plus (+) sign in the image section.
How do you post links on Pinterest?
Log into your business account and click on settings. From the drop-down box, click on the add URL link. Once the box opens, add the URL link and press save.
Conclusion
Pinterest is one of the most popular social media platforms. With millions of Pinterest followers visiting the site monthly, it is one of the best online sites to promote your business.
There are many benefits to creating a dynamic social media strategy with beautifully creative pins. Pinterest analytics and resources make it easy to increase your Pinterest traffic to your site.