
Whether you’re a business owner, freelancer, influencer, or want to start a side hustle, a website should be at the top of your list to promote your brand and increase your income potential.
At a minimum, a website will help potential customers learn about you. But that’s just the beginning. A well-designed, optimized website can actually help you automate your business and income.
The website design was once reserved for coders or software engineers. But thanks to today’s user-friendly tech landscape, you can easily start a website from scratch without experience or special training.
In today’s article, we’ll walk you through the 12 essential steps to building your website, from ideation all the way to launch.
1. Define a Unique Niche
Consistency helps people understand who you are and what you do faster. That’s why everybody needs to clearly define their niche. A “niche” refers to a specific topic or unique specialization that is reflected in your website and brand. A clear niche with the right content to back it up will position you as an authority on your topic and appeal to your target audience.
As you explore your niche, ensure it fits into these three categories:
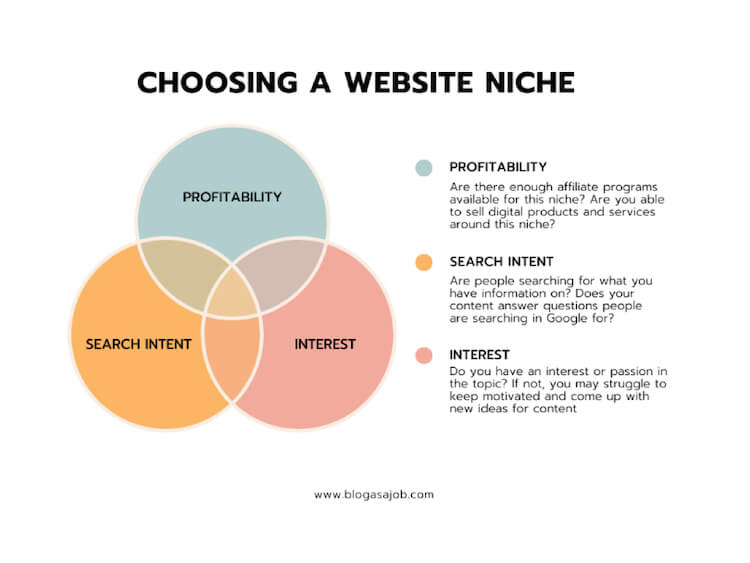
- Profitability
There are several ways to profit from your website such as affiliate programs, sponsorships, paid advertisements, and selling digital products and services. You’ll want to ensure that your niche can bring money in through one of these categories.
For example, if you are a blogger and don’t actually sell a product or service, consider a niche in “budget travel blogging,” for example, where you can earn money through affiliate links to travel companies and paid brand deals.
- Search Intent
Search intent reflects a person’s underlying motivation for using a search engine. For example, a person may be searching for information, a product, entertainment, etc..
Examples of search intent include phrases like: “how to bake a cake”, “best hotels in Europe”, and “What is global warming?”.
Be sure to evaluate your niche to understand first if people are searching for it and second, what their search intent is. If your niche is too obscure and search intent is unclear, you may not get enough traffic.
Consider using an SEO tool such as SEMrush or Ahrefs to review keyword search terms and understand the search volume that exists.
- Interest
While you don’t need to have a burning passion for your niche, it’s important that you do enjoy it somewhat! Running a successful website means coming up with new and engaging content, networking with people in your niche, and collaborating with them. If you don’t enjoy the niche you’re in, you may struggle to find the motivation to keep going.
Examples of popular niches are Health & Fitness, Technology & Gadgets, Travel & Adventure, Personal Finance, Food, and Parenting.
2. Choose A Domain Name
A domain name is essentially your website URL, for example, yourdomain.com. If you’re running a business, it’s smart to ensure your domain name is your business name as closely as possible.
If you are an influencer or run a blog, we recommend naming it after yourself or something that immediately gets the point across. It can also be a good idea to buy your own name as a domain if it’s free. If you grow to fame or notoriety, having your name as a domain is always a good idea.
Examples of Domain Names
Your domain name should effortlessly capture the essence of your website. Take inspiration from these examples:
- Making Sense of Cents: This personal finance site cleverly plays with words, combining “sense” and “cents” to convey its purpose with a touch of creativity and wit.
- Pinch of Yum: A whimsical name for a food blog, using the “pinch of” expression widely used in recipes. The addition of “yum” adds a playful twist and hints at the delicious websites on the blog.
- Budget Bytes: As you can probably guess, this is a food blog that focuses on budget-friendly but delicious recipes. The name cleverly merges the concept of budget-friendly meals (hence, budget) with the pleasure of savoring delectable food (bytes).
For websites focused on thought leadership, consider leveraging the power of your own name.
Using your name as the domain not only establishes a personal connection but also positions you as a trusted authority in your field. Some notable examples include:
- Neil Patel, a digital marketing expert who has grown into a trusted authority in the industry. His website, neilpatel.com, frequently shows up at the top of the search engine.
- Marie Forleo, an entrepreneur and business coach, uses her own name for her website marieforleo.com. By leveraging her own name, she establishes a personal connection with her audience and builds trust through her genuine and relatable approach.
- Tim Ferriss, an author, entrepreneur, and podcast host, uses his own name for his website with a simple name, tim.blog. As the name suggests, he covers a wide range of subjects, from personal development to business strategies, under his personal brand.
Register Your Domain
After you choose your domain, you’ll need to register it to ensure it belongs to you.
A domain registrar is a company that sells domain names. Some of the most popular ones include GoDaddy, Namecheap, and Google Domains.
While there aren’t too many differences between the two, it’s a good idea to compare their prices, features, and customer reviews to choose one that suits your needs. If the domain you want isn’t available (which is increasingly becoming the case), consider slight variations on the name or an abbreviation.
As you begin your search, try to choose a domain that ends in .com. Most reputable websites end in .com and people may consider .com to be more trustworthy and legitimate. However, don’t stress too much. With millions of websites out there, it can be challenging to find the perfect .com domain. We are increasingly seeing businesses leverage .co or .live.
Before purchasing your domain, consider getting one through your web provider. We’ll cover this in the next section.
3. Find a Web Hosting Provider
Web hosting is like renting a storage space but on the internet. It stores your website’s files, images, and content.
But just like storage lockers, not all web hosting providers are created equal. Thus, it’s important to find a reliable hosting provider that aligns with your goals and offers 24/7 support.
There are various hosting providers with different plans and features. Large and complicated sites with hundreds of pages will no doubt need more space and advanced features. However, a basic plan is a great start for a beginner.
You can always scale as you grow. One of our favorite providers, Hostinger, is one of the most quality yet cost-effective hosting options around.
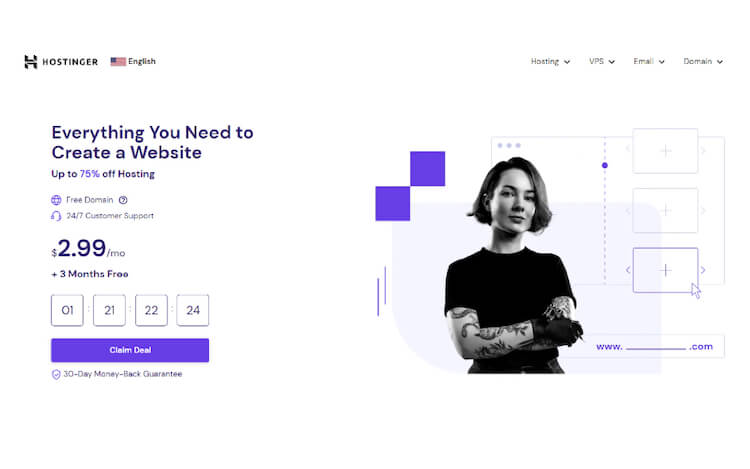
Benefits of Hostinger
Hostinger offers a variety of tools and resources to simplify your website management. Some of its main benefits include:
- Beginner-friendly interface
- Fast loading times
- 30 day money back guarantee
- Live support
- One of the lowest price hosting options around
- Free domain registration with Premium plan
Signing Up
When signing up, first select the plan that best fits your needs. We recommend the basic plan for beginnings – though you will need to register your domain separately..
If you register your domain separately, you will just need to route it from the domain registrar into Hostinger. However, if you want to simplify the process, you can always opt for the business plan which will keep everything in one place.
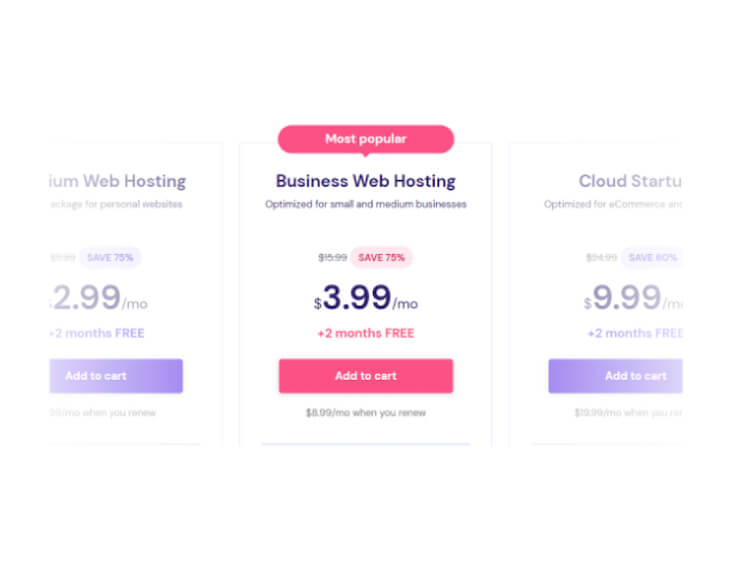
For a few extra dollars a month, the Business plan also offers many benefits that will be useful to you as your website grows and needs more support.
If you’re building a website that you expect will get a lot of traffic, at some point you may require advanced features such as increased performance and higher levels of security.
Choosing a Business plan now and having these options upfront means you’ll avoid the hassle later on of having to switch plans.
4. Install WordPress
WordPress is the most popular content management system (CMS). In fact, Over 42.9% of all websites (roughly 1.3 billion sites) on the internet are powered by WordPress.
WordPress is the website builder where all of your website dreams become a reality. You’ll use it to build the website, customize its design, write your content, and much more.
We recommend WordPress over any other website option because it by far offers the best foundation to grow and the most design customization.
To install WordPress, sign in to your Hostinger account and follow the steps below.
- Open the hosting control panel: Hostinger uses a custom control panel called hPanel. Look for an option like “Manage Website” or “hPanel” in the account dashboard and click on it.
- Locate the Auto Installer tool: Inside the hPanel, search for the “Auto Installer” tool. It may be located under a section called “Website.”
- Choose WordPress for installation: Once you’re in the Auto Installer tool, find the WordPress option, click it, and start the installation process.
- Configure your WordPress installation: Fill in the required information in the set-up wizard.
- Select any additional options: During the installation process, you may be prompted to select some additional options like themes or plugins. Don’t worry about plugins for now
- Begin installing: When all your information is good to go, click on the “Install” or “Start” button to get WordPress installed.
- Log in to WordPress: Once WordPress is installed, you’ll be ready to go with your login credentials, which you can use in theWordPress admin dashboard. Pro tip: keep your passwords handy (in a notebook or password keeper) so you don’t forget.
- To log in: You’ll want to bookmark this page. In a new browser, type the URL of your WordPress website followed by “/wp-admin” (e.g., www.yourwebsite.com/wp-admin). This will allow you to access the login window.
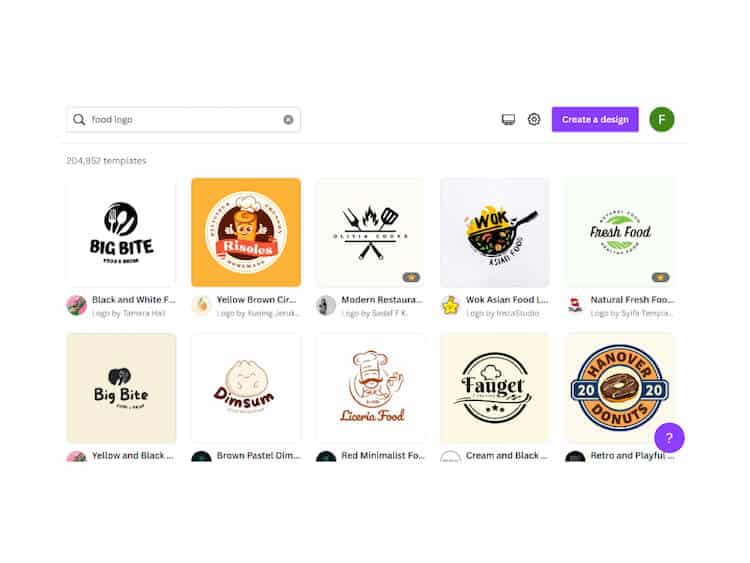
5. Create a Logo and Visual Identity
Before diving too far into the website, we recommend you first create your brand identity and visual aesthetic. Begin by creating your logo, which will serve as the basis of your brand design and will help you align your website accordingly.
Create Your Logo
Just like you don’t need to be a website developer to create a beautiful website – you also don’t need to be a graphic designer to create a professional logo.
For example, Canva Pro has hundreds of thousands of templates for you to choose from and edit with your front, color and picture preferences.
Take a look at the below search for “food logo” which has over 200k results. Once you find the vibe you like, you can customize the name and colors to suit your brand. .
Pro Tip:
If you’re busy or don’t feel comfortable diving into the design process yourself, no problem! As a business or brand owner, delegation is extremely important. There’s tons of amazing and affordable talent on Fiverr or other freelance platforms.
By working with an experienced professional to create your logo and brand design, you can save time and effortlessly bring your vision to life.
Consider Your Blog Post Graphics
We recommend every new website include a blog feature. Blogs are a valuable tool for promoting your thought leadership and helping the SEO of your new website. It’s important to ensure your blog appears professional and on-brand.
To get an idea for some style, type in “blog post” on Canva to see hundreds of styles of blog posts which will be called “featured image” in WordPress.
Don’t worry about creating these at the minute – you just want to get an idea of what’s out there and keep these designs in mind when you’re installing your theme and selecting your colors.

6. Choose a Theme
Once you have the basis for your brand aesthetic and graphic design, it’s time to install a theme. There are a few options to consider when selecting a theme:
- Free themes
- Paid/Pro/Premium themes
- Hiring a website designer
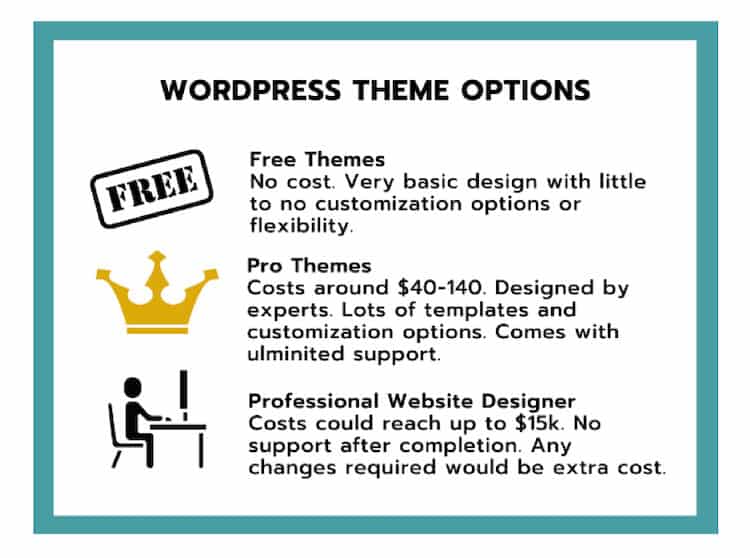
You may be tempted to start with a free theme. True, free themes today are better than those 10 years ago. But they are still inherently limited in function and customization.
Afterall, they are free! You can definitely get away with a free theme but it may be restricting as you scale.
The purpose of this guide is not to create a passable yet fun blog that is read by a small group of people.
Instead, we want to equip you with the tools and knowledge of creating a professional, scalable website that ranks on Google, processes high levels of traffic, and earns you lots of money!
If you want a great website, you should consider investing in it. Luckily, there are a few ways to do it, and it’s easy to find a way that works with your budget.
Sure, you can hire a professional website designer to handle the process from beginning to end… but unfortunately a good designer will easily set you back between $5 and $15k.
Investing in a website designer will involve a substantial amount of money. Some of our readers have had bad experiences hiring a low-priced designer (horror stories include broken websites, lack of responsiveness, and anything “extra” involving additional cost). That’s why the best “middle ground” option would be to purchase a Pro (paid) theme for much less with the same amount of customizations and flexibility.
Pro themes are great because you typically have customer support as you figure out your website and business.
Unlimited support is crucial for new businesses, whereas a designer will likely start billing you extra for additional help and troubleshooting.
So, what theme should you choose?
Why We Love Elementor
The Elementor page builder is a powerful tool that can transform the way you create and manage your web presence. Not only is it fully-customizable, but it’s intuitive and user friendly. In our experience, Elementor is the ultimate solution for achieving seamless web design.
And the numbers back it up! Over13M sites have been built using Elementor, and new websites pop up every 15 seconds! That’s why it’s always our first choice.
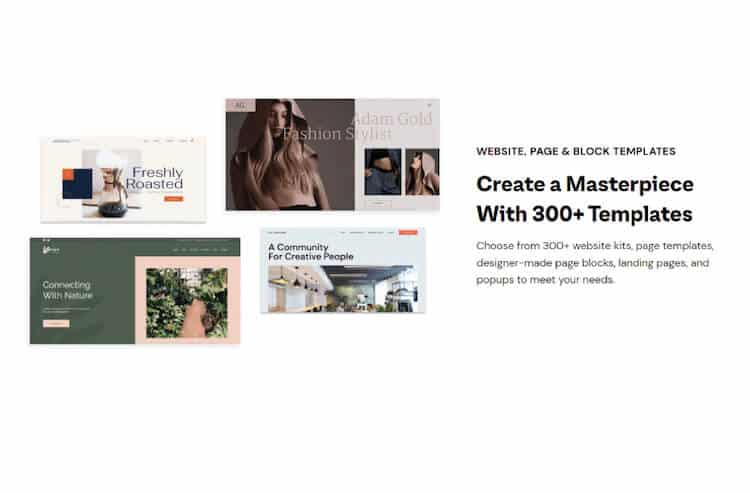
While there is a free plan available, the pro plan offers much more templates and customization, including the below:
- 300+ Basic & Pro Templates
- 100+ Basic & Pro Widgets
- WooCommerce Store Builder
- Landing Page Builder
- Pop up Builder
- Form Builder
- Marketing Tools
- Premium Support
With this pro theme/plugin, you won’t need to purchase additional themes. This puts you in the driver’s seat of creativity. If you’re rebranding, tired of your website, or just changed your mind, you still have instant access to thousands of designs and endless opportunities for personalization.
Once you’ve installed the Elementor plugin, you can play around with designs and templates to see which suits your needs best.
7. Install Plugins
Now that we’ve installed Elementor, it’s time to install other plugins you need for a successful website.
Think of plugins like “add-ons” that optimize the design, performance, and functionality of your website. There are hundreds of thousands of plugins that support a variety of different website functions, however, we recommend starting with the following list as a good basis.
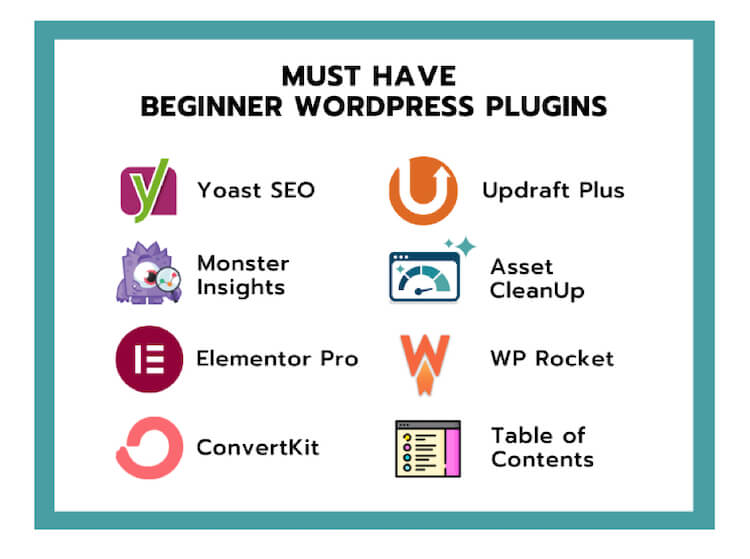
As you learn more about WordPress and work out your vision, you may want more plugins in the future. For now, we recommend installing the below.
- Yoast SEO is an easy to use SEO tool that is crucial for optimizing websites for search engines. The plugins include essential features like content analysis, XML sitemaps, and social media integration.
- ConvertKit is an all-in-one email marketing platform that includes powerful automation features, allowing users to build and manage their email lists, create targeted campaigns, and track subscriber engagement.
- Monster Insights helps you learn more about your website traffic. It integrates Google Analytics into websites, providing users with valuable insights and reports about their website traffic, audience behavior, and conversion rates.
- UpdraftPlus ensures you don’t lose your website without having to worry about it! It’s a backup plugin that simplifies the process of backing up and restoring websites, allowing users to schedule automated backups, store them in remote locations, and easily recover their data in case of emergencies.
- WP Rocket works to enhance website speed and overall performance by caching content, minifying files, and applying other optimization techniques.
- Asset CleanUp works to improve website loading times by selectively disabling unnecessary scripts and stylesheets, allowing users to optimize their website’s performance by reducing resource consumption.
- Easy Table of Contents supports blogs by automatically generating a table of contents for long articles or pages, making it easier for readers to navigate through the content and find specific sections quickly.
8. Add Content
What’s a website without content! Website content not only serves to educate viewers on your business, but it will also help you rank better in search engines.
While you can always add new pages as you go, it’s essential toIt’s essential to set up certain pages on your website before you launch. Here are three crucial pages that deserve your attention:
About Page
Here you should introduce yourself, your brand, and your goals or mission. Provide a compelling story that will resonate with your readers, showcasing what sets you apart and why they should engage with your content.
Contact Page
It’s important to include a section for readers to be able to reach out to you. Include a contact form, email address, or other preferred communication methods such as a link to your calendar. This is important for building connections and potential collaborations.
Privacy Policy Page
If you’re going to use Google ads or other ad platforms, a subscriber list, or if you’re selling anything – having a Privacy Policy page is critical.
It ensures compliance with regulations and demonstrates your commitment to safeguarding user data, building trust with your audience. Not to mention, ad platforms and affiliate programs won’t work with you without one!
9. Set up a mailing list
A mailing list serves as the basis for creating a dedicated audience and monetizing your website.
By building a relationship with your readers over time through email communication, you can promote relevant products or services, share exclusive offers, or even offer premium content to them.
We recommend ConvertKit as the go-to plugin for building email lists. Convertkit is a leading platform in email marketing, designed to simplify the process for beginners. The best part? It’s free until you reach 1000 subscribers, giving you ample room to grow before you need to pay.
Convertkit can help boost email subscribers through homepage forms and popups, blog side-bar form, and “freebies” such as a free ebook.
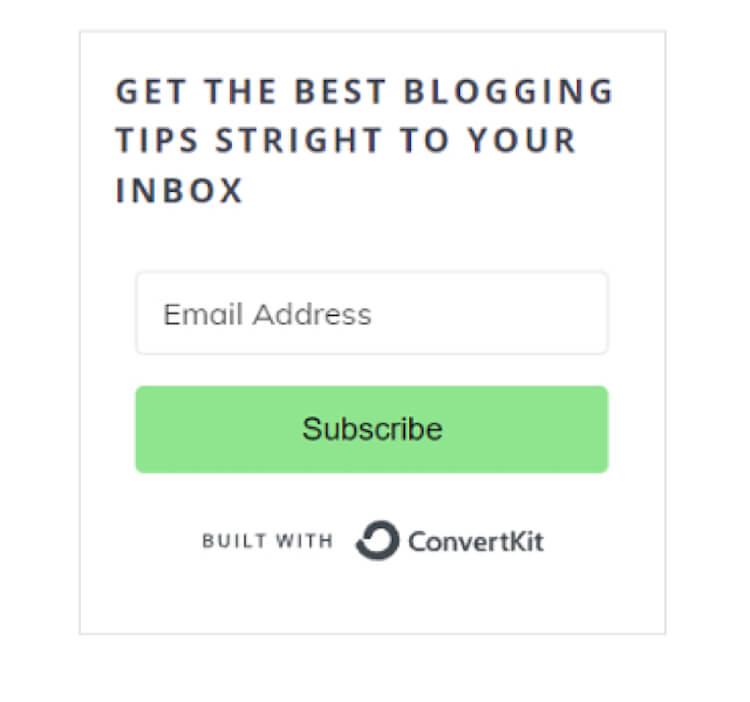
(Image: ffionwright.com)
Create Email Sequences
When someone signs up to your mailing list, it’s crucial to “onboard” them into your business through a creative and engaging welcome sequence. Through this, you introduce yourself, provide an overview of your blog or business, and guide new subscribers on what to expect.
Welcome sequences can also spotlight your best content, offering exclusive bonuses or discounts, and encourage them to explore your website further. Follow this guide from ConvertKit to start your first email sequence.
10. Further Website Set-up
Set Your Logo
Head to the WordPressCustomizer to integrate your logo into the site.
The Customizer is also where you’ll edit the majority of website design-related components.
You can access the customizer through a button on the top of your dashboard or through Appearance > Customizer in the left hand sidebar of WordPress.
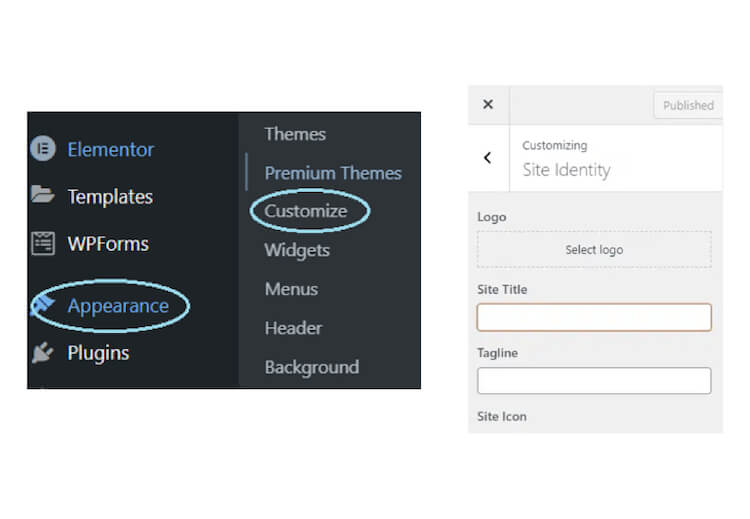 Once in the customizer, click on “Site Identity”.
Here, you’ll be prompted through uploading your logo, editing your website name, and setting up your tagline and icon.
While the tagline is optional, we recommend uploading a site icon. A site icon, or favicon, is a small image or icon that represents your website.
As you can see in the photo below, it appears in the browser’s address bar and may also be displayed in bookmarks or favorites lists.
Having a site icon gives your website a more polished and professional appearance.
Here are examples of site icons:

As you can see, they are very small, so you may want to create a new graphic if your logo is too complicated and wordy. If you’re working with a designer, ask if they can provide this.
Set Your Premlinks
Your website’s permanent links (permalinks), are the URLs that appear after your domain name. They determine how URLs are displayed on your site.
By default, WordPress blogs often use numeric strings to represent posts or pages in their link structure. However, this can have implications for both SEO and user experience.
Customized links, on the other hand, make it easier to identify the content of a page, benefiting both SEO and readers of your website.
Here’s how you can set your links.
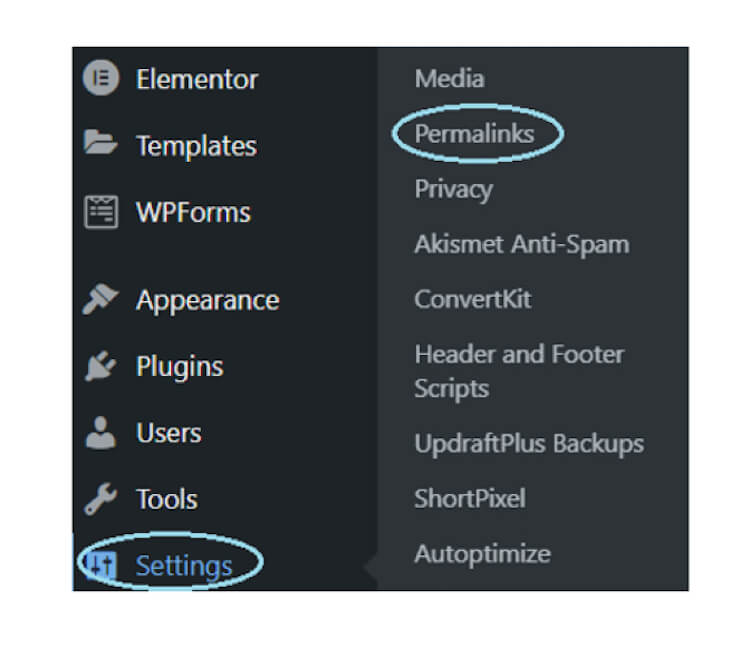
- Go to Settings > Permalinks
- Select the option called “Post name”
- Scroll down and click “Save Changes”
Create a Menu
A menu will guide readers through navigating your website with ease. Set up your menu in a few simple clicks using the steps below:
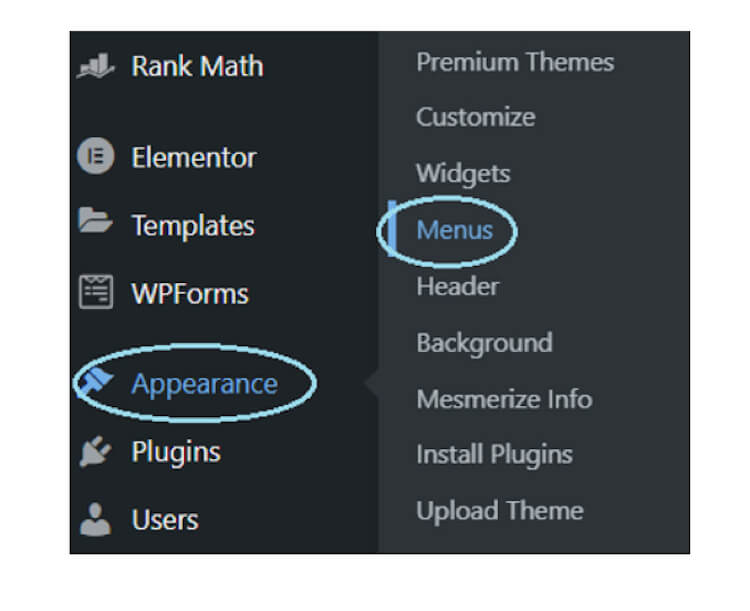
- Head to “Appearance” in your WordPress left sidebar and click on “Menus”
- Create a new menu by selecting “Create a new menu” and providing a name such as “Homepage menu”
- Select the pages, posts, or custom links you want to add as menu items
- Check the boxes next to the items you want to add, and then click the “Add to Menu” button
- Drag and drop the items to arrange their order or create sub-menus by dragging items slightly to the right.
After adding and customizing your menu items, click the “Save Menu” button to save your changes.
Footer Set-up
Footers appear at the bottom of most web pages and typically include the website name, a copyright mark, social icons, a menu and/or quick links.
For example, here’s the Thrive My Way footer:
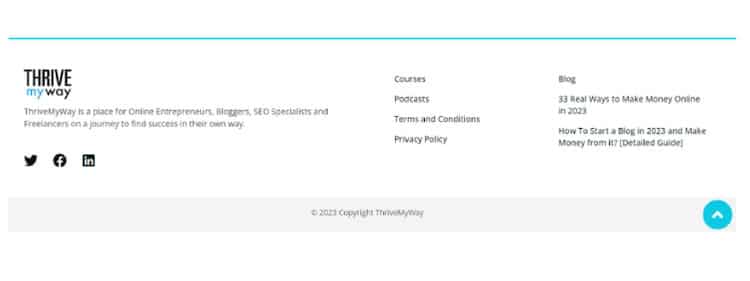
You can choose to include what you want here, there’s no set rule.
Take a look at this video from Elementor on how to create your footer.
Blog sidebar
The blog sidebar is a good standard design element for website blogs. This space provides a vertical section alongside your blog content, which helps viewers navigate to other blogs or other opportunities to engage.
The sidebar has endless possibilities including to assist your readers in navigation, expand your email subscriber list or social media following, showcase advertisements, and more.
It’s not imperative to have a sidebar so you can always add it in later as you grow.
Here are some examples:
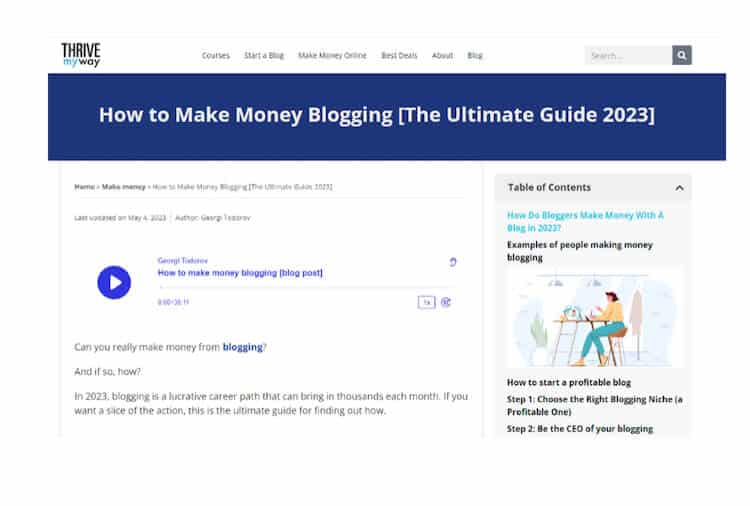
Thrive My Way uses the side-bar section to include a sticky Table of Contents so that readers can always navigate to another part of the post without having to scroll up.
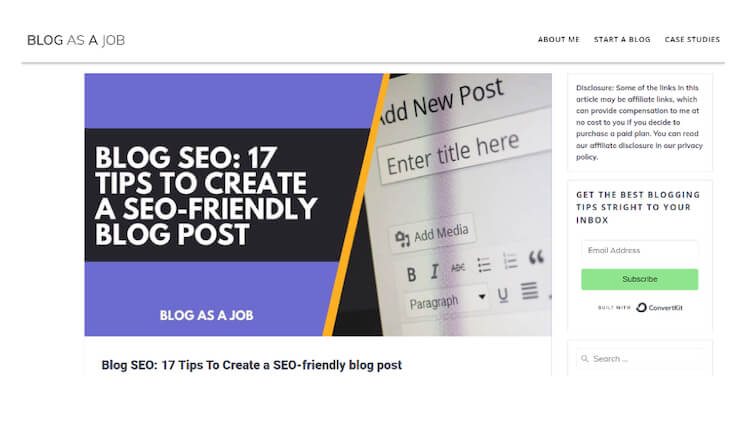
Blog as a Job uses the side-bar to include an affiliate disclaimer, a newsletter sign up form and a Search bar.
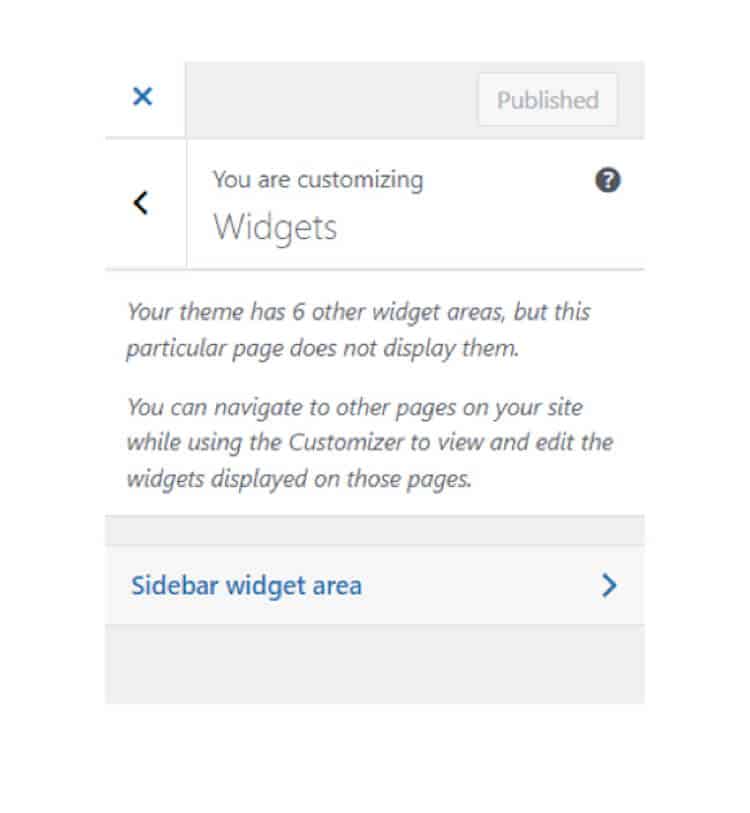
To edit your side-bar, head to the Customizer.
The location of your side-bar editor may depend on your theme but you can usually find it under headings such as “Layout Settings,” “General Settings,” or “Widgets”.
 Blog Comments
To allow comments or not allow comments, that is the question. As an internet user, you’ve probably seen just how chaotic comment sections can get on post, Tweet, or Instagram video. While you would think website owners would desire engagement on their sites, blog comments can often create more problems than benefits.
Although some argue for their value, we believe that is no longer the case as blog comments nowadays tend to attract spam rather than genuine interaction.
Instead of investing time in moderating these spammy comments, it is more productive to focus on other ways for fostering engagement.
If you wish to disable blog comments and channel your efforts more effectively, you must do it manually.
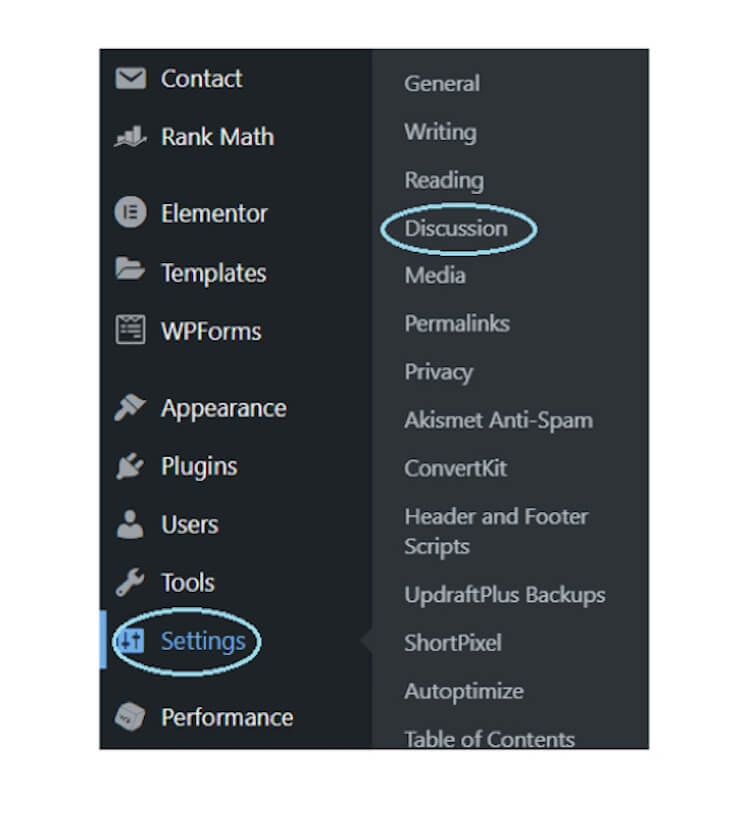
- Head to Settings > Discussions
- In the section “default post settings” uncheck the options “allow people to post comments on new articles” and “allow link notifications from other blogs”
- Click on “Save Changes”
 11. Test and Launch Your Website
Congratulations on reaching this exciting step! Before unveiling your website to the world, it’s vital to conduct comprehensive testing to ensure it’s ready.
Go through this checklist to verify it’s good to go. We suggest asking a friend or family member to do it as well as they may catch something you haven’t. The more eyes on your website before it goes live, the better.
- All links are working
- All forms submit correctly
- There are no mistakes (run your content through Grammarly)
- The website is user-friendly across different devices and browsers
Once you’ve completed the checks, you can go ahead and remove the “coming soon” from your website and launch it to the world.
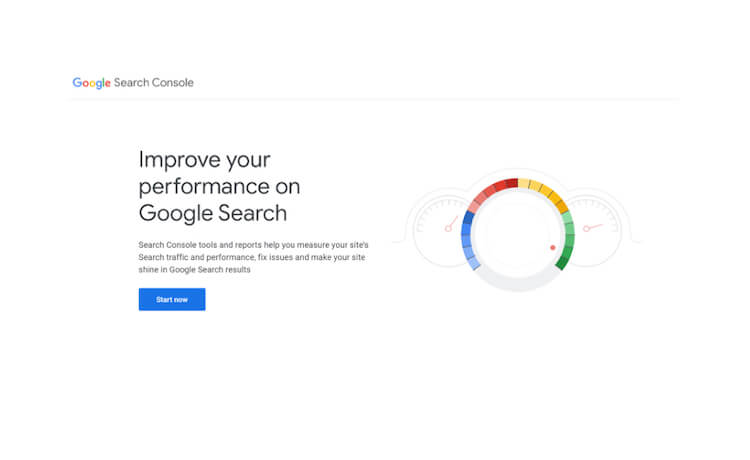
12. Sign Up for Google Search Console
Now that your website is live, it’s important to make sure it’s visible by signing up for Google Search Console.
This will make your website discoverable by search engines and also help you monitor and optimize your website’s performance, identify technical issues, and analyze links.
Check Google Search Console regularly to learn website insights as well as get notified about any issues that need to be changed.
Getting started with Search Console is as simple as a few short steps
- Go to Google Search Console
- Select “Start Now”
- Sign in with your Google account. If you don’t have one, hit “create an account”
- Next, you’ll be prompted to add a “‘property” (aka a website). Enter your website URL and continue.
- Verify that you are indeed the website owner. You can select from several verification methods, including adding an HTML tag to your website’s header, uploading an HTML file to your website, or verifying via your domain name provider. Choose what works best for you and follow the directions to complete the set up.
Once the ownership is verified, you’ll be directed to the Google Search Console dashboard, where you can access various reports, data, and tools related to your website’s performance in the search engine.
Start familiarizing yourself with the different sections and features of the Console and try out the various reports and settings available to gain insights into your website’s search visibility and it’s performance.
Conclusion
Congratulations on setting up your website! While this is a significant milestone, the work doesn’t stop here. To maximize the potential of your website, it’s crucial to focus on optimizing your website for search engine optimization (SEO).
After all, there’s no point in having a beautiful website if no one’s going to see it!
As you write your blog posts, it will be crucial to conduct thorough keyword research and follow SEO guidelines as you’re writing.